Island Volcano Eruption Breakdown
Latest project, done using Houdini, Substance Painter, and NUKE for the final composite. Fun exercise using a variety of references. This is a result of lectures given to VFX students learning the software of Houdini from the ground up. I wanted to utilize different references and scenarios and see what I could accomplish in a short timespan within the confines of the machine, software and time constraints given.
If you like this type of breakdown, be sure to follow me for more!
Every time I work on a project, regardless if it is for instructional purpose or not, I start with a mood/reference board. Our goal for this project was to stick to real world reference. This is difficult! Most volcanoes are captured after their grand moment.
References

Terrain Work - Building the Mountain
For the terrain, the focus was on shape and form as that would drive numerous effects later. The textures were created in Substance using the UDIM workflows.


Detailed flow maps were generated using the Houdini Heightfield toolkit and Out context for baking textures to be used as masks in Substance.

The next step in the process was to start minor look development. The ocean here is a simple grid and volume underlying to achieve the ocean look.
First Slap Comp
FX Simulations
Because of limitations such as the machine and time the effects for the shot were the most challenging as expected. These challenges include reducing the scale, while maintaining believability. In order to achieve this, the simulations are layered with numerous work arounds. This is where the majority of the time was spent in the development of the shot.
Remember... iterations, iterations, iterations.
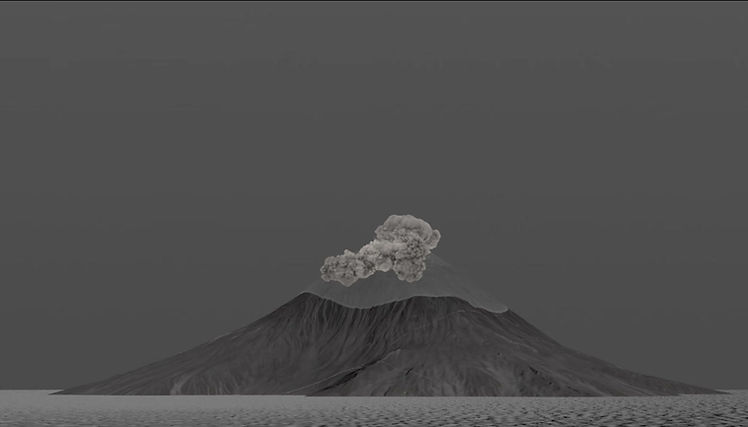
Pyro Ash Column

Two different approaches. For the main ash column (ejecting into the atmosphere), temperature was the key factor into shaping the velocity field. In fact, there is little to no velocity added outside of a quick pump added at around the 36 frame mark.
The sauce into the shaping was animating using CHOPs. I added a sin wave oscillation into a divergence field at the base of the column. This gives the pulsing look of pressure rapidly being released at a large scale.
To achieve the rolling and billowing nature of the smoke. I advected points up the column. Inside of DOPs, I used the points to create an additional divergence field using their world space locations. This gives the volcanic ash look to the pyro simulation.

After the simulation is cached, the final look is achieved by remapping the density field, sharpening using a volume convolve, and then clamping any stray densities. The color was added in Karma using the Karma Pyro Shader.
Pyroclastic Ash
The second approach was used for the Pyroclastic Ash. This method allows for much more control over the shaping. Because the ash is traveling down the mountain rather than up naturally as it should, some liberties have to be taken to achieve a more realistic look.
The first step is to create a particle simulation to control direction, focus, and pacing of the evolution of the pyroclastic flow.
Also did I mention iterations? There was about 3 TB (!!) of simulations before I landed on one that I found to be suitable for the shot.

After shaping with the particles, and rasterizing them into the appropriate voxel size. The simulation was altered in 2 distinct ways. One divergence was added using the particles created, and two gravity was added as an exterior force on the density. Temperature was added but at a significantly reduced amount. The velocity field was the main weapon of choice here.

The postproduction for the pyroclastic flow is nearly identical to the main ash column. There are numerous iterations. The final look is below.

Shockwave
Now for some fun. The shockwave! If you enjoy crashes and freezing this section is for you. After much dismay, I landed on this process.

The first step was to scatter alot of points over the entirety of the volcano. And then using an expression, animate a change of color propagating in the direction of the shockwave.

Once the color attribute is in place. We can use that to drive all the attributes necessary to create a compelling shockwave with dust kick up down the slope. First is the density attribute.

Velocity is added using a noise pattern with a very high frequency. The color attribute from before is used to create a noticeable spike in the velocity. Note the UNNATURAL ramp in the velocity (it should be falling off). This was added to add extra kick up once the dust hits the ocean surface.
Combined we are able to achieve a dynamic velocity field. This field is also affected by the simulated vel fields from the other pyro simulations withing the scene.

Here is the result of the main simulations. (NOTE: there are many other simulations such as a small RBD simulation, light trails, and heat on the surface.)
Lighting - Comp - Finish
Here is where the fun begins. We bring everything home here with the final lighting in Solaris and rendered using the Karma CPU package included within Houdini. I used Karma CPU to avoid any issues with XPU or other packages due to the nature of the materials used in the development of the shot. Swipe or use the arrows to progress through the process below!

Raw Render
For the lighting package, I stuck to a simple Karma Physical Sky. Materials are Karma Materials and Karma Pyro Materials.
The only deviation is the color attribute of the shockwave. This was taken directly from the terrain! This was done using an attribute from maps SOP to create color information over a scatter, then advecting those points using velocity.
Final Product and Conclusion

Thank you for following along with my musings. This is a 10,000 foot overhead look into the project which took about 4 weeks to complete, countless iterations, countless hurdles. I am looking forward to doing more of these breakdowns in the future, so I hope you see value in this!
If you want more breakdowns such as this, please be sure to follow me on the platforms where I post content!